Chapter 10 ~ How to Finance
Your Greatest Dream
⬆ Shiftrefresh Shift-Refresh this page to see the most up-to-date instructions.

In this century, it is conceivable that we can do whatever we want with our lives: make a purchase, change a lifestyle, travel, or develop a new skill. Anything is possible if one has support, time, and money.
So begin to dream big! What do you want out of life? What fun do you want to engage in?
Dr. Lissa Rankin wrote in Psychology Today a list of 15 tips for dreaming big. The most important, in my opinion, is to ask yourself “What would you do if you took fear out of the equation?” She also reminds you to squelch your inner critic and try to visualize the dream. (Rankin 2010) Some dreamers create vision boards or surf the net looking for ideas. Annette White, a bucket List blogger, provides 1000+ Bucket List Ideas that you can add to your bucket list.
In this assignment, we'll visualize one of your bucket list dreams in a spreadsheet and write up your notes to explain it.
No, you will not have to act on the dream for this class! Let's just pretend. In the process, you'll learn about yourself, what other people have done to achieve the same dream, and how you can meet financial goals.
Now that you know how much money you have (because you completed the previous chapter's personal finance spreadsheet), you can plan ahead... envision a single dream...a physical, tangible item or service and write about it. Then, you'll build a spreadsheet to correlate with that single dream.
10.1 Write about a bucket list dream.
10.1.1 Start a Bucket List.

Within your personal (rather than OSU) Keep, OneNote, or Notes app, create a new note called Bucket List and use the checkbox/list feature to create a list of activities you want to do or large purchases you want to make some day. Keep adding to the list as life progresses (or at least for a few minutes so you can pick one for this assignment).
Review the list again to pick just one topic that would require you to make 10 or more purchases to fulfill it. The topic must be complex enough to have multiple options for 10 or more items/services you could purchase in order to complete it. If you are thinking of traveling somewhere, then you'll want to compare three levels of costs for 10 items or levels of costs for 3 destinations. If you're thinking of buying a car, then what three brands of car would you compare and which accessories are important? If you want to move to another city, then compare three cities and each of the items/services needed to settle in there.
Please note that "debt-reduction" is not a good topic for this project.
10.1.2 Describe the dream's options.
- Launch a word processing document and save the filename as: Bucket List Budget First Last Name.
- Reuse the Beaver colors, Normal style, and Heading styles from chapter 6's design work.

- Save the file every 5 minutes if using Word.
- Add a heading 1 that says: Bucket List Budget
- Add a Normal paragraph that states your first and last name and the year.
- Add a Heading 2 that that states your topic. For example: A trip to Mexico City.

- In the first paragraph state what the activity or purchase is. Focus on a single topic with a financial component to it, such as multiple expenses for physical items and tangible services.
- In the second paragraph write about why you want to fulfill this dream.
- In the third paragraph write about how other people accomplished the same dream. Do the research...blog posts are a great place to start. Describe how they fulfilled their dream as it relates to how you might fulfill your dream. Select and copy the URL of the source, then, type and select the article title in your paragraph and Ctrlk or ⌘k to add a hyperlink.
- In the fourth paragraph write about obstacles to fulfilling the dream and how you might overcome them.
- In the fifth paragraph write about your
level of comfort with tracking your finances.
Do you use a Banking application to see how much money you have and/or spend?
Does your family pay for some or all of your expenses and do they keep track of it for you?
How do you keep track of your income from a job or Financial Aid? Do you use online tools?
Note, also, your thoughts on creating and using the personal finance sheet you created in the previous chapter. Do you think you'll continue to use it to track your income, expenses, and discretionary funds? - In the sixth paragraph write a description of three different spending scenarios for the bucket list item/service/trip you're budgeting for. Who would participate (you and a friend)? Where will it take place? When would it happen? How would you get there? What items are needed to complete the mission for each scenario? What would you do before, during, and after to ensure success? Use the numbering tool to automatically number your three scenarios.
- Later, once you've completed the Bucket List Budget sheet in step 10.2, you'll paste a copy of that sheet under this paragraph.
10.2 Design a bucket list budget.
- Open the existing Personal Finances file and click the + New Worksheet tab at the bottom.
- Double-click the worksheet name at the bottom to change it to [Dream] Budget.
Replace [Dream] with your topic, so it is specific.

- Label Row 1 with:
Expenses in Column A1,
Scenario 1 in Column B1,
Scenario 2 in Column C1, and
Scenario 3 in Column D1.
 Yihan Wang demonstrates how to start the Dream Budget sheet in Mandarin (with English subtitles). (2021)
- Click on the Row 1 selector on the left. Apply Bold using Cntlb or ⌘b. Bold the entire row, not just the heading.
- Shiftclick on the column selectors for A through D.
Then, click the align right button to align the numbers and labels to the right.

- Shiftclick on the column selectors for B through D
and choose the $ financial dollar sign button to apply dollar signs to the numbers.
For Excel users, click the formatting icon to change the Accounting $ numbers to Currency.

- While Columns B through D are still selected, choose the .0 ← or .0 → icon to remove the decimal places.

10.3 Research the three scenarios.
Each dream is different and requires different combinations of expenses to help it be successful. Based on what you wrote about in paragraph 6, research costs for 10 or more physical items and/or tangible services that must be purchased in order to fulfill the dream. For each of those categories of expenses, provide costs for three different options, such as different times/seasons, brands, locations, levels of cost, levels of quality, etc. Keep reading to find out more and refer to the examples below.
- In Row 1, columns B, C, and D, redefine the three scenario column headings to differentiate them. Make them more specific and descriptive. For example:
- Renting an Apartment

- Buying a Home

- Purchasing a Car

- Comparing Hotels

- Traveling to a City

- Adopting a Pet

- Renting an Apartment
- In cells A2 through A11, type the names of ten or more expenses that are needed to compare those three scenarios.
Here are typical expenses for big-ticket items:
- Renting an Apartment

- Purchasing a Car

- Adopting a Pet

- Traveling

- Buying a Home

- Renting an Apartment
- In Column B, C, and D's money cells 2 through 11,
type in real amounts based on research of actual costs.
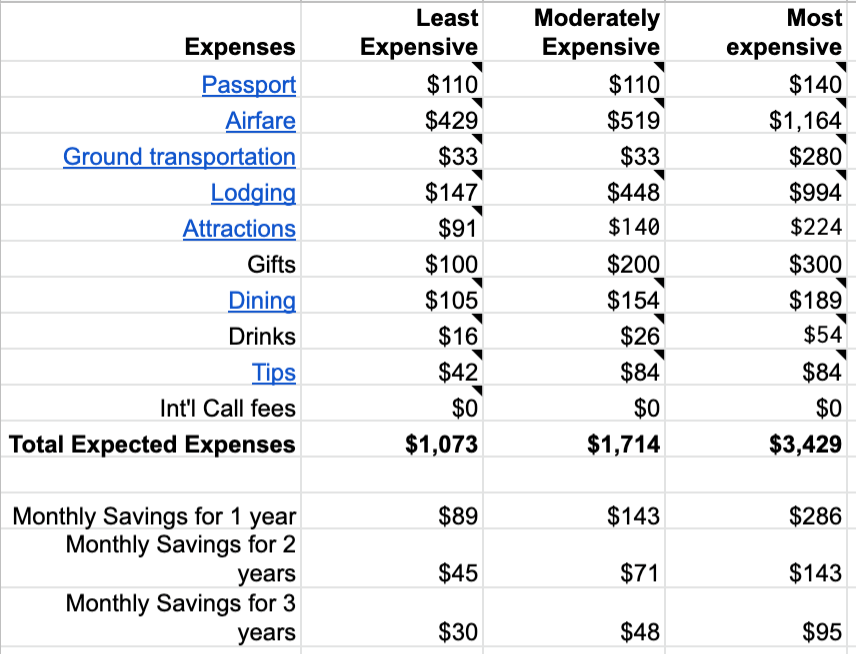
For example, if you were going to travel from Portland to Mexico City,
the American passport price might be $110 in two scenarios, but $140 if you also want to get the ID card.
The Airfare prices from PDX in Portland to MEX in Mexico City might be
$429 for an overnight Aeromexico flight,
$519 for a non-stop Delta flight, and
$1164 for a first-class United flight.

Another example: A column of your sheet could represent 5-star hotel stays with room service meals and another could represent hostel stays with homemade meals. - Hyperlink Scenario column headings, Expense row headings, and/or amounts.
Ctrlc or ⌘c to copy the URL of the website where you found the prices.
Right-click on the cell and choose Link or Ctl or ⌘k
and paste in the URL. This will allow you to jump right back to those price comparisons in the future.
Now that Google and Excel both allow hyperlinking of numbers without compromising the calculations,
you can hyperlink the numbers and/or the column headings and/or the expense categories.
We'll accept a variety of at least 3 hyperlinks.

Set the numbers to Currency format (rather than the Accounting format), so that the hyperlinks don't interfere with future calculations. - Right-click on each scenario cell and choose Insert Note to describe the parameters of that price, such as
August 6 Roundtrip Areomexico overnight nonstop flight PDX to MEX.

- Research and type amounts for each expense and correlating scenario cell. Type notes and make hyperlinks for each so you can refer back to your original research.
- Use math in each cell where 2 or more amounts need to be added or otherwise calculated.
Explain the amounts in the Notes for each.
Add Links to row headings as needed to help you make future revisions.

- Under the last row of expenses, label the Column A cell with Total Expected Expenses.
- Select the number cells in column B, then choose the ∑SUM option to auto-fill the sum of numbers in the Total Expected Expenses row.
Do the same for Column C and D.
OR Copy the B sum cell and paste it at the bottom of Column C and D...like magic,
the function will change to fit the column it is in.


- Click on the Total Expected Expenses selector on the left. Apply Bold using Cntlb. Bold the entire row, not just the heading.
- Under the Total Expected Expenses row, add three new rows labeled with
Monthly Savings for 1 year,
Monthly Savings for 2 years, and
Monthly Savings for 3 years.
If you'll be making a large purchase, such as a car or house, then calculate savings for the downpayment, not for the loan amount. Downpayments should be - negative numbers in red. - In the Column B For 1 year cell,
use math to capture the Total... cell's value and divide it by 12 months, like this:
=B12/12.
Copy that function to the For 2 years and For 3 years cells in Columns C and D.
Update the number of months in the math equation to 24 months and 36 months respectively.

If the scenario expenses include a Downpayment, then calculate the savings of that amount, rather than the total loan amount. And, be sure to change the Downpayment cell values to a negative number to display a positive amount to save, like this:

- Save the file with Ctrls or ⌘s.
10.4 Add the budget to the document.
So that you can display a visual representation of your financial data to correlate with the written explanation of your dream, add the new Budget spreadsheet data to the document you wrote in earlier.
- In the spreadsheet file's Budget worksheet, select all the columns and rows that have labels and data.

- Copy the selected cells with Ctrlc or ⌘c.
- Navigate back to the Bucket List Budget document and place the cursor under the sixth paragraph about your dream scenarios, then paste or insert the data:
- Paste the selected cells with Ctrlv or from the menu, locate the worksheet.
- Paste the selected cells with Ctrlv or ⌘v.
- Fix problems that may have occurred when pasting, such as:
- Skinny row headings for expenses must not wrap. Stretch column A to show the entire label on one line (this improves readability of the numbers, too).
- Add bold to column and row headings.
- Left-aligned numbers must be changed to right-aligned numbers.
- Numbers must use Currency ($) and whole numbers (no decimal places).
- Don't worry about notes or comments that didn't paste (they are not scored).
- Hyperlinks should work just fine when pasted.
- If the spreadsheet splits onto two pages, then place the cursor before the spreadsheet and add a page break:
- CtrlEnter or ⌘Enter to force it onto a new page.
-
From the tab, choose and Page (the first option).

- Save the file with Ctrls or ⌘s.
10.5 Compare discretionary total to scenarios.
- Compare the monthly Discretionary amount in the Income Expenses worksheet with the Save for... amounts in the Dream Budget worksheet. Which scenario and savings plan fits your situation?
- In the seventh paragraph of the Bucket List Budget document, write a conclusion about how your finances are or are not adequate to fulfill the dream within 1 to 3 years.
- In the eighth paragraph, note where in your Income/Expenses you could make adjustments which would allow you to fulfill the dream. And note where in the Dream Budget you could adjust options to decrease the amount of savings needed.
- If writing in Google Docs, use the menu to access the TurnItIn Draft Coach. Click the Similarity tab to run a report. Also run the Grammar tab report if you typically write poorly. Make corrections to render a clean report.
10.6 Ask for help.
Stuck on a specific step? Share your file with the instructor.
In order for the instructor and TAs to see your progress without having to download or ask for account permission, provide a correctly-set sharing URL so they can look at it live. Follow the most appropriate instructions below.
Paste the sharing URL into the Canvas Inbox message or Assignment Comment box, along with your questions. Note which step number you're stuck on.
Share Microsoft Office files from the OSU OneDrive cloud drive and share Google Suite files from the OSU Google cloud drive:
- Windows or Microsoft Account
- Login to your OSU OneDrive account from the browser.
- Drag the file from your hard drive to the OSU OneDrive file list in the browser to transfer it there.
- Beside the file name in the list, click the
 Share icon:
- Choose the settings provided in the screenshot below:

- Copy the link so you can provide it to the instructor or in the Assignment Comment box.


- Google Account
- With your file open, click the Sharing button at the top right of the screen. Or, if the file is not open but listed in the Drive, right-click it to choose the Share menu.
- Click the Get Link box to update the OSU Settings and copy the link:

- Ignore the Share with People and Groups box for this course.

Paste the URL into the Canvas Inbox message or Assignment Comment box, along with your questions. Note which step number you're stuck on.
10.7 Verify your work.
10.7.1 Doesn't your budget worksheet look great!
← The results of your worksheet should look something like this.
Notice that there are 3 scenarios for 10 or more unique purchases.
Notice that all numbers are whole (no decimals) and align to the right. (Number columns are always aligned to the right in spreadsheets.) The row headings are aligned to the right as well to improve readability. Space is provided between Total row and Savings rows to make it easy to differentiate them. All total headings and related data cells are bold, as are the column headers.
In addition, notice that the amounts make sense; they are based on actual options found through research
and are hyperlinked for easy reference.
The notes provide additional details (however, they will only paste in if using Google Sheets and not Excel).
10.7.2 Doesn't your budget worksheet look great!
From the Canvas Home tab, click the Ch 10 ~ Bucket List Budget. Scroll to the bottom to see the Rubric. Compare your work to the Rubric to ensure you've included all paragraphs and design elements as well as reviewed/edited your work. The rubric is based on the following scoring criteria, which are based on the instructions above: Check off each criterion to confirm you've completed them before submitting the file.
- Document is free of plagiarism.
- Document was submitted as a PDF file.
- Document design reuses Beaver colors, heading styles, and Normal style.
- Heading 1, 2, and byline are provided.
- First paragraph describes the activity or purchase.
- Second paragraph describes why you want to fulfill the activity/purchase.
- Third paragraph describes and cites at least one article discussing how someone else fulfilled the same dream.
- Fourth paragraph describes obstacles to fulfilling the dream.
- Fifth paragraph describes your level of comfort with tracking finances.
- Sixth paragraph describes three dream spending scenarios and each are numbered automatically.
- Budget sheet is nicely displayed under paragraph 6.
- Budget sheet includes 10 or more expenses which are shared by 3 scenarios.
- Hyperlinks are applied to 3 or more scenario headings, expense categories, and/or amounts.
- Sheet displays all on one page.
- Column/row headings are bold.
- Row headings for expense categories do not wrap.
- All number columns are aligned to the right.
- Totals use dollar signs with whole numbers (no decimals).
- Sheet uses the sum function accurately.
- Seventh paragraph analyzes the scenario and savings plan that might work to help fulfill the dream.
- Eighth paragraph analyzes ways to adjust monthly expenses and the budget expenses to improve chances of fulfilling the dream.
- Document is free of spelling and grammatical errors.
10.8 Submit the file.
Each assignment must be submitted before the Due date and time as specified on the Canvas Home tab. The Available Until date and time constitutes a grace period, which can be used in an emergency, or if you are ill (it cannot be used for every assignment). Students who submit using the Available Until date may incur score reduction. Students on a DAS Flexibility Contract: there is no need to notify the instructor. All of your Available Until dates will be set to 72 hours past the Due Date, which can be used up to 3 times. Abuse of the Flexibility Contract will be reported to DAS.
- Click on the Canvas Home button and scroll down to the Ch 10 ~ Bucket List Budget assignment. Click the assignment link.
- Upload the PDF file. Confirm that it uploaded.
 Check the TurnItIn Report for plagiarized phrases and sentences.
Review how to use TurnItIn.
Edit or add quote marks in your original file to ensure the second draft of the file will pass the TurnItIn inspection.
Resave the PDF file.
Upload the newer version in the assignment's Submission Details screen.
Check the TurnItIn Report for plagiarized phrases and sentences.
Review how to use TurnItIn.
Edit or add quote marks in your original file to ensure the second draft of the file will pass the TurnItIn inspection.
Resave the PDF file.
Upload the newer version in the assignment's Submission Details screen.

- Within 3 days of submission, be on the lookout for Rubric feedback and Comments from the TA and Instructor.
- Ask questions about the score and feedback in the assignment's Commenting box.


 Applications → Preview → File → Take Screenshot → From Selection

