Chapter 6 ~ How The Software Industry Works
⬆ Shiftrefresh Shift-Refresh this page to see the most up-to-date instructions.
← This Week's Objectives walk you through the steps to embellish the design of a word processing document with a table of contents, footer, and new heading styles. These style changes get added to your writing about how software works, its history, and modern methods. The topics you'll write about are foundational, new technologies, and diversity and inclusion problems in the Software industry.
And for fun, you'll create your order app using Python programming language. You'll share your app and programming experience in the Discussion to keep the fun going.
This chapter's skills and discussion will take between 4 and 12 hours to complete.
6.1 Write about how software development works.
When you enter the workplace, understanding the language and industry of computer science will be necessary when working with Information Technology (IT) professionals. You'll not only be expected to understand what the IT department is communicating, but you want them to understand you as well. In this lesson you'll write about the computer science topics as well as redesign the word processing document so it looks professional.
6.1.1 Launch the word processor.
Open a new word processing document and save the filename as How Software Development Works and your first and last name. Move the file to your CS 101 folder.
6.1.2 Summarize a computer programming topic.
Choose one topic from the list below and summarize it in the first paragraph. Right-click on the article's title and choose Copy link address, then, select the name of the article in your paragraph and Ctrlk or ⌘k to add a hyperlink. Apply Style > Normal to the paragraph. Don't add bold to keywords yet. Capture the bibliographic data of your source(s) using your bibliography tool. *
* The Crash Course video authors are Green, Hank and John, the date of publication is listed on YouTube, and the publisher is Complexly.
6.1.3 Analyze an industry technology.
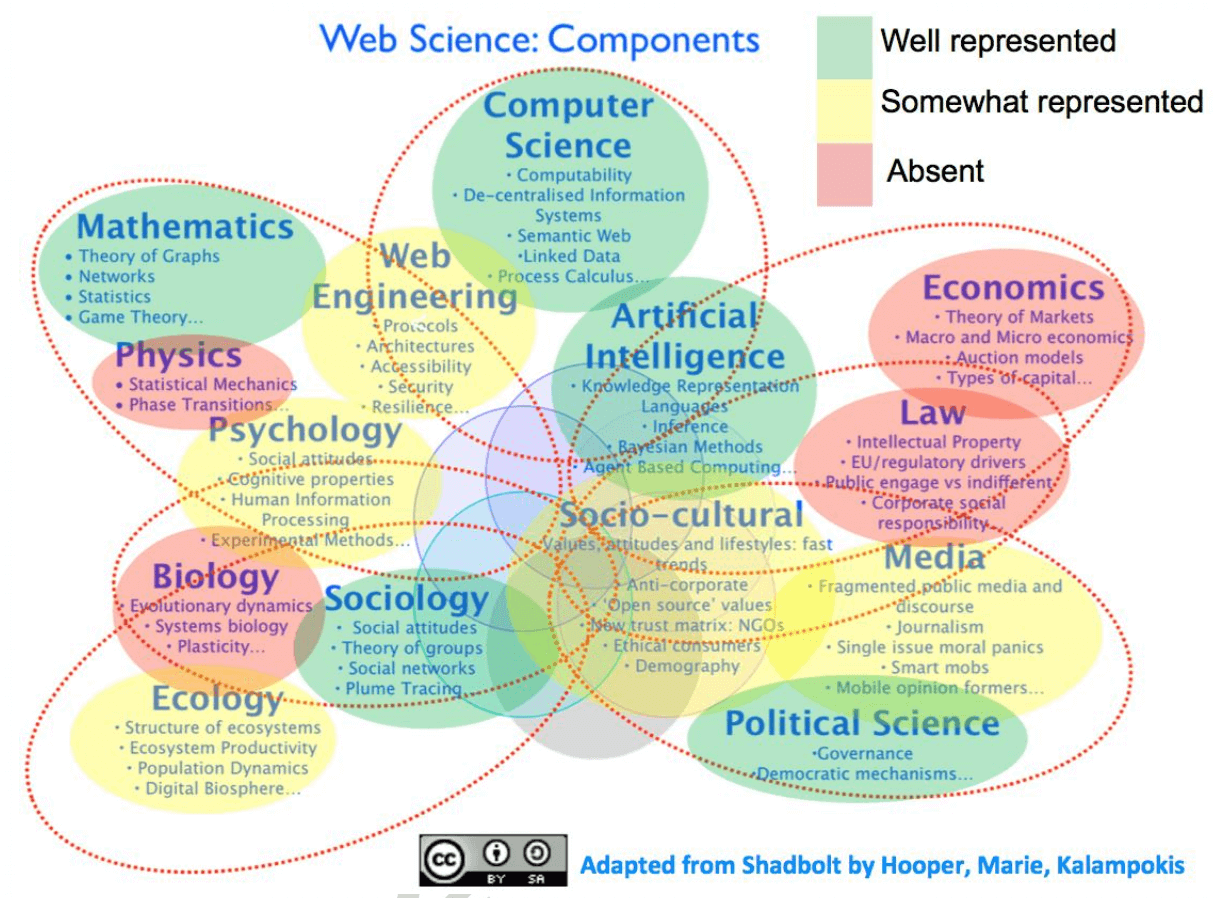 Human computer interaction, foundations and new paradigms
Choose one industry term from the list below to research. Type a heading for the topic and apply Heading 2. In the second paragraph, describe the technology and note its benefits and problems. Right-click on the article title and choose Copy link address, then, select the name of the article in your paragraph and Ctrlk or ⌘k to add a hyperlink. Apply Style > Normal to the paragraph. Don't add bold to keywords yet. Capture the bibliographic data of your source(s) using your bibliography tool.
- Programming with AI (new)
- Metaverse
- Big Data
- Blockchain
- Edge Computing
- Open Source Software
- Cloud Computing
- Low Code Development
- Crowdsourcing & Citizen Science
6.1.4 Analyze a diversity and inclusion problem.
Choose one diversity and inclusion term from the list below to research. Type a heading for the topic and apply Heading 2. In the third paragraph, describe the problem and analyze solution(s). Add hyperlinks to the source titles. Apply Style > Normal to the paragraph. Don't add bold to keywords yet. Capture the bibliographic data of your source(s) using your bibliography tool.
- Leaky Pipeline
- Diverse workforce
- Rolling back Diversity, Equity, and Inclusion initiatives in the Tech industry
- Section 508 of the Americans with Disabilities Act (ADA)
- Unconscious bias in computing
- Analytics and 'behavior microtargeting'
- Facial Recognition
6.1.5 Improve the bibliography.
- Remove all blank pages at the top and bottom of your document, if any.
- Add the word Bibliography to the last page of your document and apply the Heading 2 style.
- Paste all the bibliography entries (3 or more expected) under the heading. Be sure to add author names, titles, publish dates, correct publisher names, and URLs if your tool did not provide them. (Remember, YouTube is not the author or publisher of user-uploaded media.)
- Select the list of entries and apply the style, then apply the format_list_numbered Numbered list icon. Do not alphabetize the list, so that each entry can be easily located for scoring purposes.
6.2 Design the word processing document.
Eye fatigue is a constant problem for TAs and the Instructor, due to the hundreds of items they score every week. Using the following required font, font-size, line height, and footer styles will ensure they can read your work quickly.
In addition, a university student's work should look professional, so that when they enter the job market, their visual communication skills are not perceived as amateurish. The skills you'll learn and practice below are basic, foundational skills that every college student should know before they graduate (especially if they'll list 'word processing' on their résumés).
6.2.1 Update the font styles.
Change the Normal or Body text style:
- Microsoft Word
Heather Bruce demonstrates how to update Normal style in Word for Mac. (2021)
- Select all of the text using Ctrla or ⌘a.
- Right-click on the selected text and choose Font.
Change the font to Open Sans or Tahoma and the font size to 12pt.
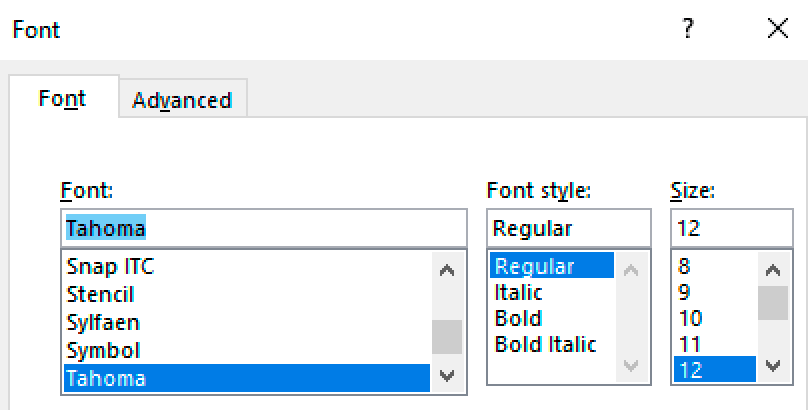 Click OK.
- Right-click on the text again to choose Paragraph.
Change the first-line indent to .25,
the spacing after to 10pt,
and the line spacing to at least 18pt.
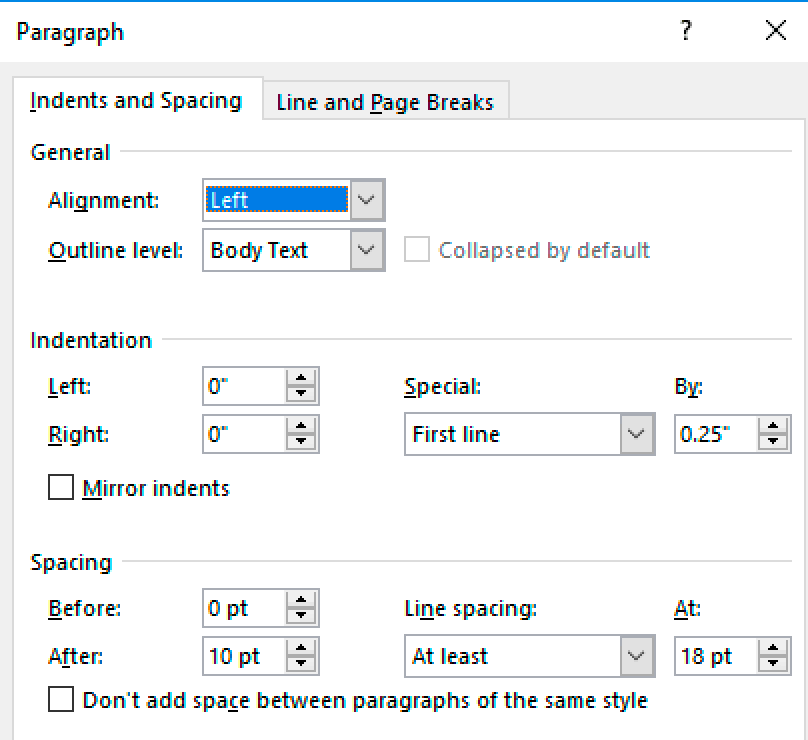 Click OK.
- With that same text/styles selected, right-click on the Style > Normal button on the Home tab (or from the right-click menu).
- Choose Update to Match....
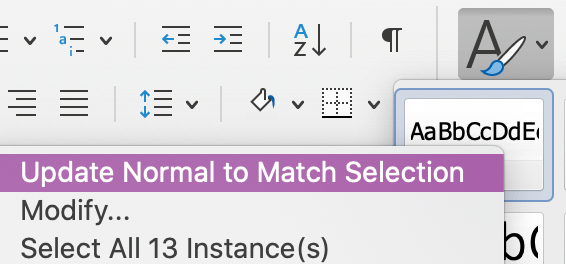
- If the hyperlink's default blue and underline styles disappear, then select those hyperlinks again and apply blue and underline.
- Google Docs
- Select all paragraphs (excluding the bibliography),
change the font to Roboto and the font size to 12pt.

- Slide the indenting ruler to .25 inches to the right
(or Format > Align & indent > Indentation options and type 0.25 inches in the measurement field.)

- From the menu,
choose then Line Spacing > 1.15 and After > 10.
Set Before > 0.
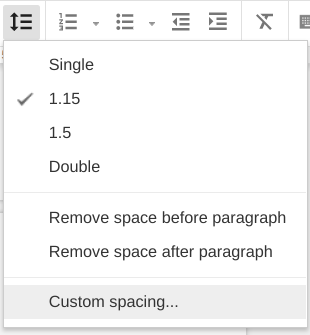
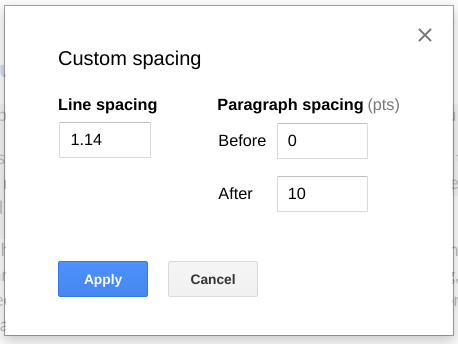
- Click the arrow next to the menu.
Choose Update Normal Text to Match..

- If the hyperlink's default blue and underline styles disappear, then select those hyperlinks again and apply blue and underline.
- Select all paragraphs (excluding the bibliography),
change the font to Roboto and the font size to 12pt.
6.2.2 Update and apply heading styles.
The Headings will be based on the Normal style, so be sure you've applied the modified Normal style above.
- Heading 1:
At the top of the document, add a heading called How Software Development Works.
Select the text by triple-clicking on it.
- Microsoft Word
Heather Bruce demonstrates how to update Heading 1 style in Word for Mac. (2021)
- Right-click on the selected text and choose Font.
- Change the font to Open Sans or Tahoma, the size to 22pt, and apply Italic, Bold, and Beaver Orange
(via the Text Color palette, customize the color using Hex Color: #D73F09 or RGB color to 215, 63, 9).

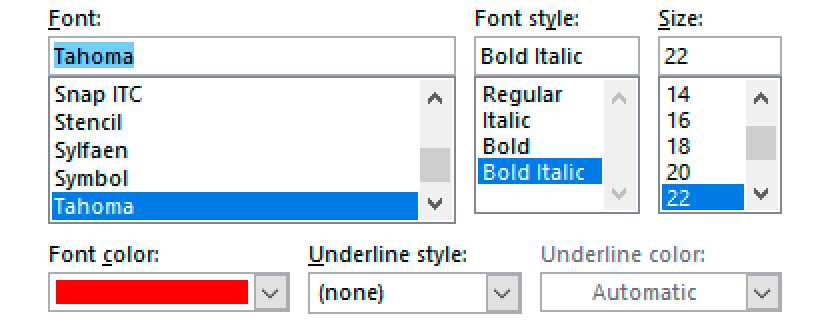 Click OK.
- Right-click on the heading text again to choose Paragraph.
Change the first-line indent to 0.
 Click OK.
- With that same heading text selected, right-click on the Style > Heading 1 button on the Home tab (or from the right-click menu).
- Choose Update to Match....

- Google Docs
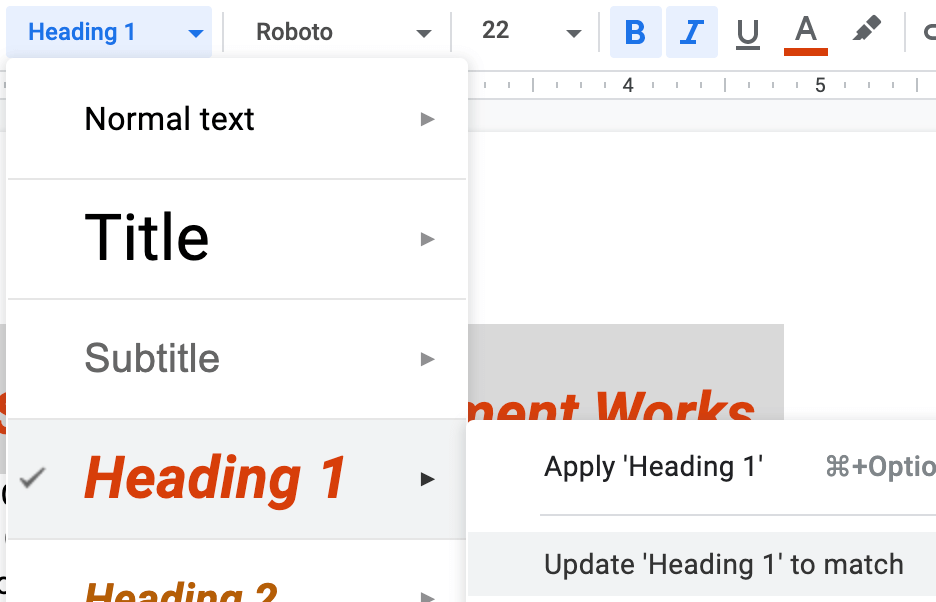
Change the font to Roboto Bold, the size to 22pt, and apply Italic as well as custom-make Beaver Orange
(via the Text Color palette, customize the color using Hex Color: #D73F09).
 From the Style menu, choose Heading 1 > Update to Match.
- Microsoft Word
Heather Bruce demonstrates how to update Heading 1 style in Word for Mac. (2021)
- Heading 2:
Select the first Heading 2 by triple-clicking on it.
- Microsoft Word
Heather Bruce demonstrates how to update Heading 2 style in Word for Mac. (2021)
- Right-click on the selected text and choose Font.
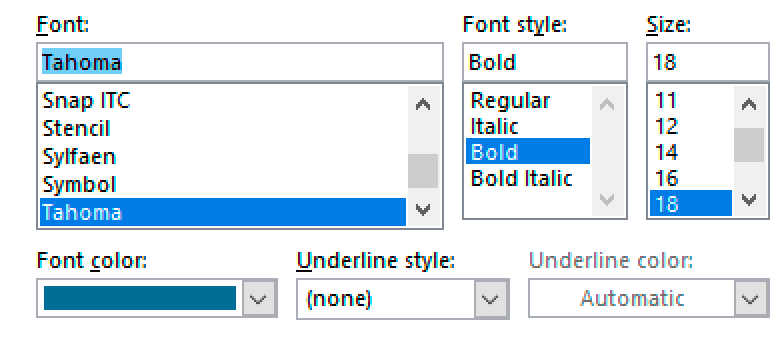
- Change the font to Open Sans or Tahoma, the size to 18pt, and apply Bold, and custom-make Stratosphere Blue
(via the Text Color palette, customize the color using Hex Color: Hex #006A8E or RGB to 0, 106, 142.
 Click OK.
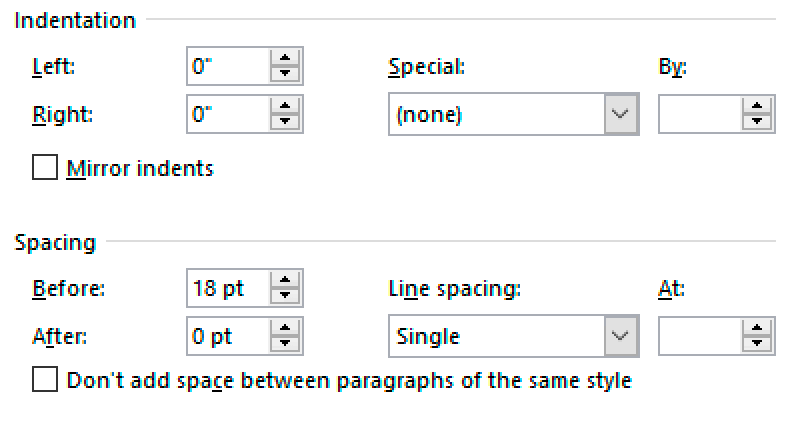
- Right-click on the subheading text again to choose Paragraph. Change the first-line indent to 0.
- Update the Paragraph's line spacing to single spacing and space before to 18pt.
This will visually tie the heading to its paragraph and separate it from the other sets of headings and paragraphs.
 Click OK.
- With that same heading text selected, right-click on the Style > Heading 2 button on the Home tab (or from the right-click menu).
- Choose Update to Match....

- Apply the new Heading 2 style to all of the paragraph's subheading text, including the Bibliography.
- Google Docs
- Select the subheading text.
- Ensure the font is set to Roboto, then apply Bold, size 18pt.
- Customize the color to Stratosphere Blue (Hex #006A8E or RGB to 0, 106, 142).
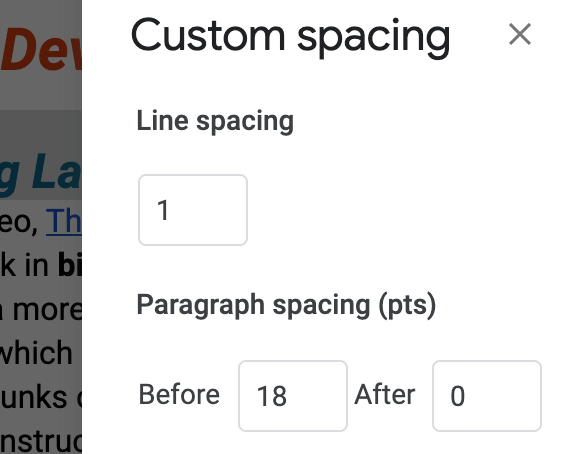
- Update the heading line spacing to single spacing and space before to 18pt.
- Set the first-line indent to 0. This will visually tie the heading to its paragraph and separate it from the other sets of headings and paragraphs.
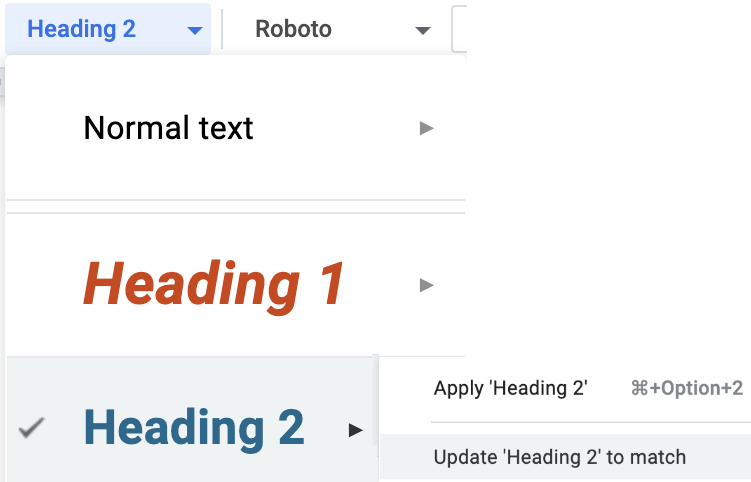
- From the Style menu, choose Heading 2 > Update to Match.
- Microsoft Word
Heather Bruce demonstrates how to update Heading 2 style in Word for Mac. (2021)

6.2.3 Add a footer with page numbering, counting, and line.
-
Heather Bruce demonstrates how to update Heading 2 style in Word for Mac. (2021)
- From the tab, choose > Grid, Insight, Semaphore, or Bold Number 3 style.

The goal is to show the page number and page count. - If necessary, force the page numbering to the right using the tab's right-align button.
- If your Footer style is missing a horizontal line above it,
then, from the tab, choose > Line.
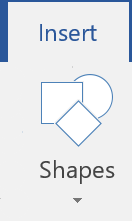
Drag the line tool from left to right just above or beside the page numbers.
From the tab, choose Black.
- If your version of MS Word does not include a theme with page number and count, then try the
How to include the total number of pages along with the current page number tutorial, or this method:
- Within the footer, to the right of the page number and spacer symbol (such as the vertical bar character found under the delete/backspace key), add another space.
- CtrlF9.
- Type NUMPAGES between the resulting curly braces {}.

- ShiftF9 to save the function.
- Double-check that the resulting number is correct by scrolling to the last page.
- From the tab, choose > Grid, Insight, Semaphore, or Bold Number 3 style.
-
- Place the cursor in that new footer area and from the menu,
choose Page numbering and
the option that starts numbering on page one.
(If your document had a more formal cover page, then you could opt to leave page numbering off of it.)
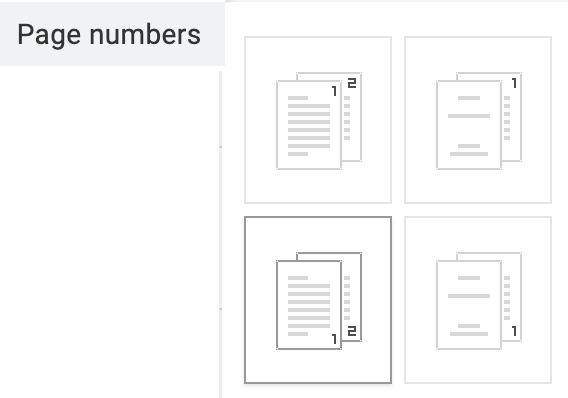
- While the page number is selected inside the footer, click the right-align button to force it to the right.

- On page 1's footer, place the cursor after the number.
Type a slash / or vertical bar |.
Select the Page Count option from the menu's Footer menu.

- From Footer > menu, update the footer margin to 0.
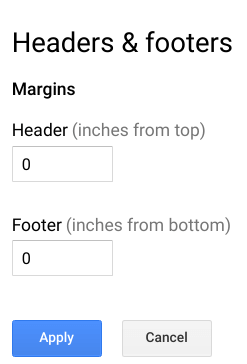
- From the menu, choose Horizontal Line. It typically ends up above the footer numbers.
The footer should look like this now:

- Place the cursor in that new footer area and from the menu,
choose Page numbering and
the option that starts numbering on page one.
(If your document had a more formal cover page, then you could opt to leave page numbering off of it.)
6.2.4 Add a dynamic table of contents to the first page.
Place the cursor under the orange Heading 1. Apply the Normal style.
-
Virginia Cincotti demonstrates how to add and modify an automatic table of contents in MS Word (2021)
- From the tab, choose > Automatic Table 2 (or something similar, like Classic).
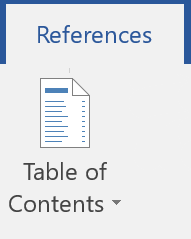
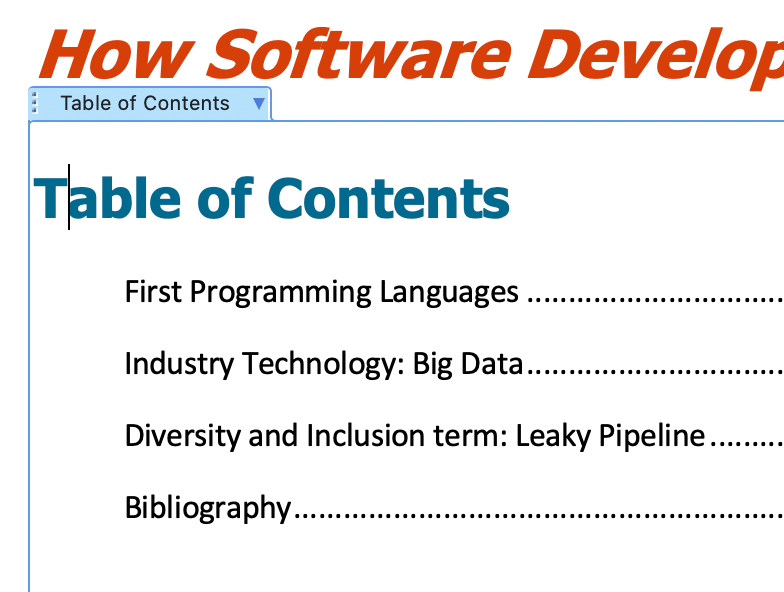
- Select and delete the redundant Heading 1 item from the list and type Table of Contents (if it is missing) and apply Heading 2 to it.,
so it looks like this:
- If you add more text and the page numbering changes, then
use the tab menu to choose Update Table (then update the heading 2 and remove the redundant heading).

- From the tab, choose > Automatic Table 2 (or something similar, like Classic).
-
- From the menu, choose Table of Contents with page numbers.
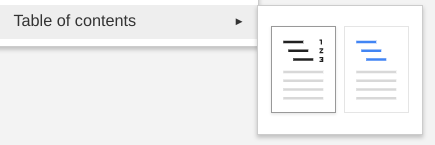
- Notice that headings from all of the pages are automatically added with page numbering.
- Select and delete the redundant Heading 1 item from the list
 so that the Table of Contents on the first page looks like this:
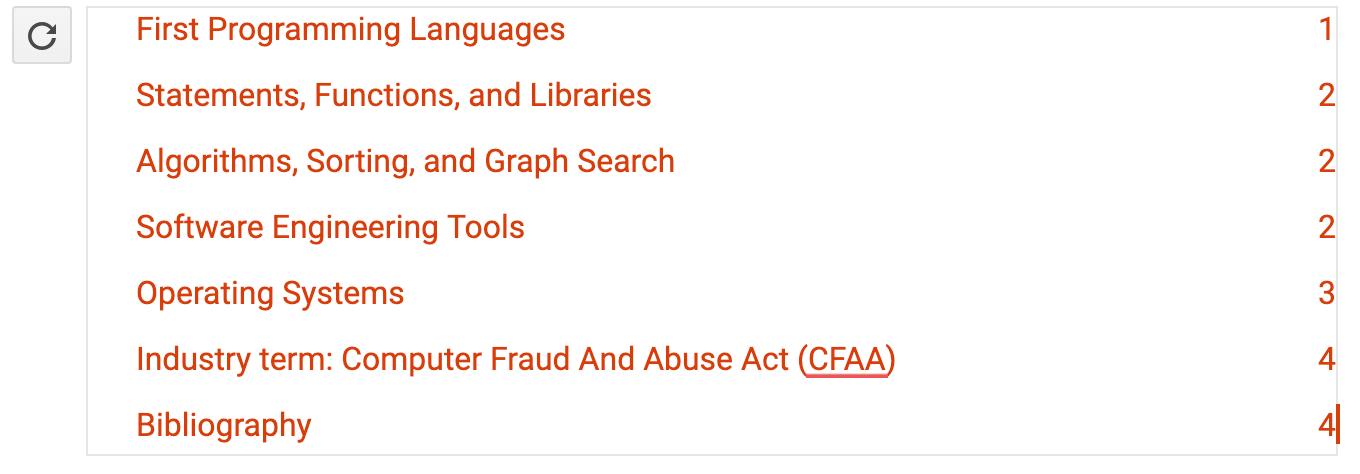
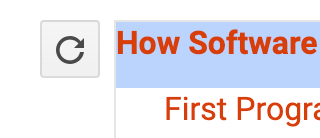
- If you add more text and the page numbering changes, then click the refreshRefresh icon.
- Feel free to add a Heading 2 at the top that says "Table of Contents".
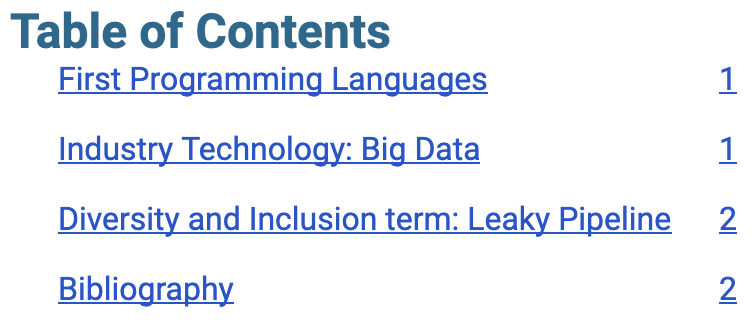
- From the menu, choose Table of Contents with page numbers.
6.2.5 Add a copyright statement.
Add a copyright statement under the table of contents list to certify that you own the content of this document.
-
From the tab, choose or .
Choose the © symbol.
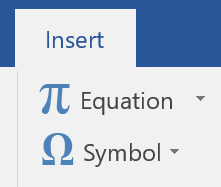
Or, use this keystroke: Alt0169. - From the menu, choose Special Characters or Symbols. Search for the word 'copyright' and click on the resulting © symbol. Click the X to close the popup screen.
- Optiong to make the copyright symbol.
After the symbol, add a space, the year, another space, and your first and last name.
Do not use commas and remember the space between each item.
Select that text and apply the Normal style, if it isn't already,
and click the right-align button to set it to the right.
The result will look like this:

When you make copyright statements in the future, remember that only a human or a business can own intellectual property (a domain name or website cannot).
6.2.6 Review the Bibliography styles.
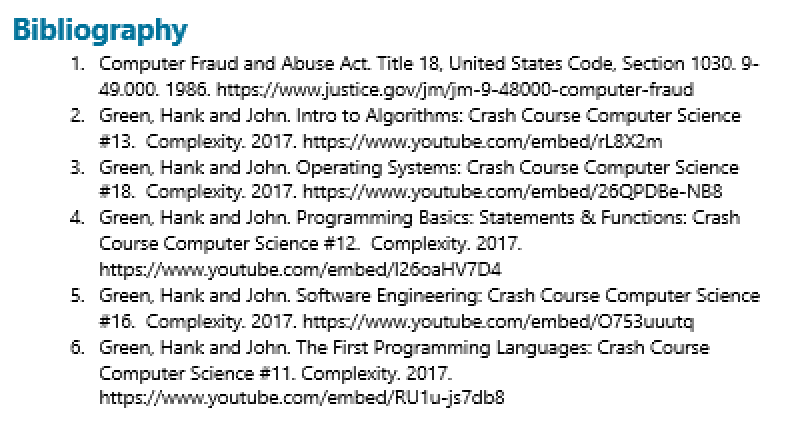
Double-check that your bibliography is still set to Normal style and that Numbering produced the correct spacing. If your bibliography list doesn't look like this, then review step 6.1.5 (above):
YouTube is not the author or publisher of user-uploaded media, so remove the name from your entries.
6.2.7 Add bold to keywords.
In each of the paragraphs you wrote, select important key concepts (usually single words) and apply the Bold style. Doing this before you revise and apply the new Normal style will erase the bold in Microsoft Word and sometimes in Google Docs. This will also give you an opportunity to review your writing and correct errors as well as solidify the concepts in your memory.
6.2.8 Save as PDF.
- If writing in Google Docs, use the menu to access the TurnItIn Draft Coach. Click the Similarity tab to run a report. Also run the Grammar tab report if you typically write poorly. Make corrections to render a clean report.
- Save the document as a PDF file.
- > PDF/XPS. Save the file to your CS 101 folder on the hard drive.
6.3 Ask for help.
Stuck on a specific step? Share your file with the instructor.
In order for the instructor and TAs to see your progress without having to download or ask for account permission, provide a correctly-set sharing URL so they can look at it live. Follow the most appropriate instructions below.
Paste the sharing URL into the Canvas Inbox message or Assignment Comment box, along with your questions. Note which step number you're stuck on.
Share Microsoft Office files from the OSU OneDrive cloud drive and share Google Suite files from the OSU Google cloud drive:
- Windows or Microsoft Account
- Login to your OSU OneDrive account from the browser.
- Drag the file from your hard drive to the OSU OneDrive file list in the browser to transfer it there.
- Beside the file name in the list, click the
 Share icon:
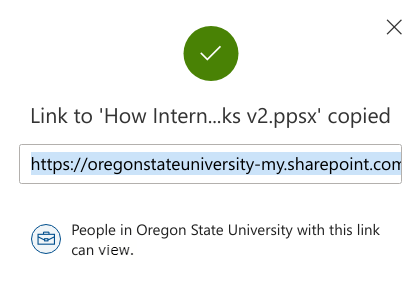
- Choose the settings provided in the screenshot below:
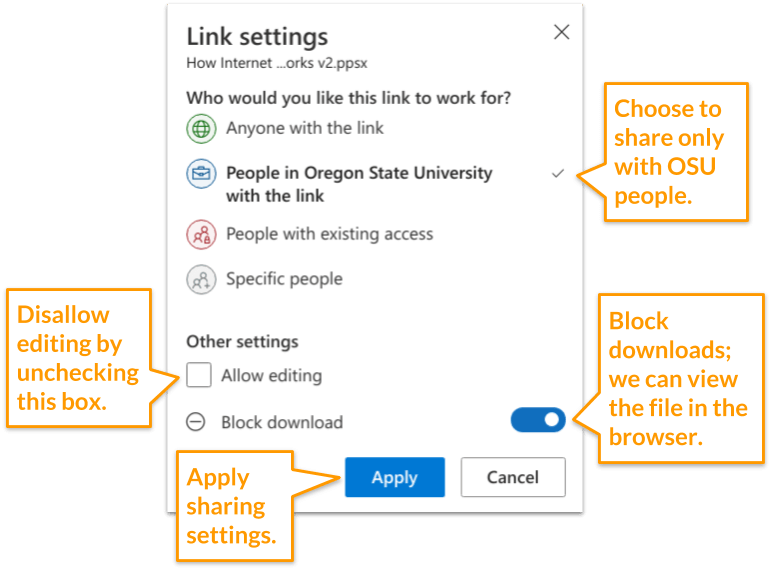
- Copy the link so you can provide it to the instructor or in the Assignment Comment box.

- Google Account
- With your file open, click the Sharing button at the top right of the screen. Or, if the file is not open but listed in the Drive, right-click it to choose the Share menu.
- Click the Get Link box to update the OSU Settings and copy the link:

- Ignore the Share with People and Groups box for this course.

Paste the URL into the Canvas Inbox message or Assignment Comment box, along with your questions. Note which step number you're stuck on.
6.4 Verify your work.
Doesn't your new document look great!

The Heading 1 style aligns left in 22pt bold italic Beaver Orange Roboto or Open Sans or Tahoma font with no first-line indentation.
The Table of Contents automatically generates page numbers based on the Heading 2s that were applied to the section headings above each paragraph. The first heading is removed from the list of sections but the "Table of Contents" text can remain and be set to Heading 2 (optional). Your version of the software may output different colors, which is OK. Just be sure that the page numbers are provided next to the heading 2 text.
Heading 2 styles are set to 18pt bold Stratosphere with 18pt space above and no space below, along with no first-line indentation.
The paragraphs are set to Normal style in 12pt black Open Sans (or Tahoma for Word) or Roboto font (for Google Docs), with line height set to 1.15 (Google Docs) or at least 18pt (Word) and a .25 first-line indentation.
The bibliography includes 3 or more sources set to Normal style with Numbering applied.
From the Canvas Home tab, click the Ch 6 ~ How Software Development Works assignment.
- Document is submitted as a single PDF file.
- Document is free of plagiarism.
- Heading 1 is Beaver Orange in 22pt bold italic Roboto or Open Sans/Tahoma font.
- Table of Contents is automatically generated from all Heading 2s.
- Copyright statement is properly rendered with symbol, year, and name and aligned to the right.
- Heading 2s are left-justified Stratosphere Blue in 18pt bold Roboto or Open Sans/Tahoma font with 18pt spacing before and 0 spacing after.
- Text is 12pt Roboto or Open Sans/Tahoma text with 1.15 line spacing (or 18pt) and a .25 indent.
- Footers include a horizontal line with page number and page count.
- First paragraph summarizes and cites a Computer Programming topic. Key concepts are bolded.
- Second paragraph analyzes and cites the benefits and problems of an industry technology. Key concepts are bolded.
- Third paragraph analyzes and cites a computing diversity and inclusion problem and solution. Key concepts are bolded.
- Bibliography includes 3 or more entries with complete data and is Numbered in Normal style.
- Document is free of spelling and grammar errors.
6.5 Submit the file.
Each assignment must be submitted before the Due date and time as specified on the Canvas Home tab. The Available Until date and time constitutes a grace period, which can be used in an emergency, or if you are ill (it cannot be used for every assignment). Students who submit using the Available Until date may incur score reduction. Students on a DAS Flexibility Contract: there is no need to notify the instructor. All of your Available Until dates will be set to 72 hours past the Due Date, which can be used up to 3 times. Abuse of the Flexibility Contract will be reported to DAS.
- Click on the Canvas Home button and scroll down to the Ch 6 ~ How Software Development Works assignment. Click the assignment link.
- Upload the PDF file. Confirm that it uploaded.
 Check the TurnItIn Report for plagiarized phrases and sentences.
Review how to use TurnItIn.
Edit or add quote marks in your original file to ensure the second draft of the file will pass the TurnItIn inspection.
Resave the PDF file.
Upload the newer version in the assignment's Submission Details screen.
Check the TurnItIn Report for plagiarized phrases and sentences.
Review how to use TurnItIn.
Edit or add quote marks in your original file to ensure the second draft of the file will pass the TurnItIn inspection.
Resave the PDF file.
Upload the newer version in the assignment's Submission Details screen.- Within 3 days of submission, be on the lookout for Rubric feedback and Comments from the TA and Instructor.
- Ask questions about the score and feedback in the assignment's Commenting box.

